Configuración de su dispositivo Shield
Table of Contents
Changing the printer IP address
Moving Shields between Printers
ACDC Adapters and other Regulatory Information
Descripción del producto
Shield is a dedicated industrial security appliance developed by Stratasys, that segregates Stratasys printers from the network, monitors network traffic and applies security measures in order to protect the printer, functioning as a dedicated network safeguard for connected assets.
Este es un dispositivo de red innovador, independiente y del tamaño de la palma de la mano que ofrece conectividad altamente segura para activos físicos de alto valor (como impresoras Stratasys) que se implementan en verticales industriales como manufactura, instalaciones inteligentes, agricultura y energía. Shield protege la impresora de ataques originados en la red y protege la red de ataques originados en un activo potencialmente comprometido al aislar y defender ambos extremos.
Deployment of the Shield does not require any modifications or configuration changes to the printer and does not impact customer operations or other security measures. It complements existing security measures, offering defence in depth.
Supported Printers
Shields supports Stratasys FDM and PolyJet 3D printers and can be connected to the following models.
| Tecnología de impresión | Printer Family | Printer Model |
| FDM | Serie F123 | F120, F170, F270, F370, F770 |
| F123CR Series | F190CR, F370CR | |
| Fortus | Fortus 360mc Small, Fortus 360mc Large, Fortus 380mc, Fortus 380mc Carbon Fiber Edition, Fortus 400mc, Fortus 450mc, Fortus 900mc, F900 | |
| Polyjet | J3/J5 Series | Stratasys J3 DentaJet, Stratasys J35 Pro, Stratasys J5 DentaJet, Stratasys J5 MediJet, Stratasys J55 Prime, Stratasys J55 Pro |
| J7/J8 Series | Stratasys J700 Dental, Stratasys J720 Dental, Stratasys J735, Stratasys J750, Stratasys J750 Digital Anatomy, Stratasys J850,Stratasys J826 Prime, Stratasys J835 Prime, Stratasys J850 Digital Anatomy, Stratasys J850 Prime, Stratasys J850 Prime FabriX, Stratasys J850 Pro, Stratasys J850 TechStyle | |
| J4100 | J4100 |
Moving a Shield between printers is described in the section Moving Shields between Printers.
Compatible software
The following Stratasys software is compatible with Shield:
- GrabCAD Print desktop (both Standard and Pro)
- GrabCAD Print Server
- GrabCAD Control (via GrabCAD Print Server)
- Control Center
- GrabCAD Printer Connectivity API
Managing Shield
A Shield is managed through GrabCAD Print desktop when in possession of a valid GrabCAD Streamline Pro license.
Multiple Shields can be managed at the same time or from different GrabCAD Print desktop installations.
Any updates to a Shield will come bundled with a new GrabCAD Print desktop version, including firmware and shield software.
A Shield will never connect to the internet to fetch updates.
GrabCAD Print desktop will determine if a Shield is in need of an update and will push the update automatically to the Shield, no action from the side of the user is needed.
Lista de componentes clave
- Dispositivo Shield X 1

- Almohadillas de velcro X 2 (almohadilla 1 ya colocada en Shield)

- Cable Ethernet (para conectar la impresora a Shield) X1

- EU power adapter, 5V/2A with USB type C connector X 1
.png)
- Adaptador de corriente para EE. UU., 5V/2A con conector USB tipo C X 1
.png)
- Toallita presaturada (húmeda) para preparación del montaje X 1
.png)
- Toallita seca para preparación del montaje X 1
.png)
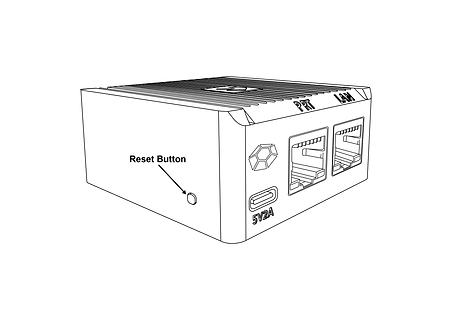
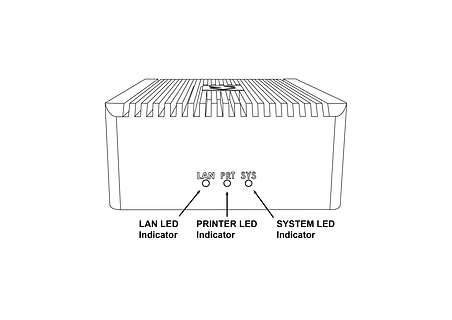
Vistas del dispositivo Shield
%20(1).png)
%20(1).png)
%20(1).png)
Montaje de Shield
Please complete all steps specified in the Shield Installation section before mounting the shield.
- Seleccione una ubicación de montaje específica en la parte superior o lateral de la impresora, como se muestra en las imágenes a continuación. Si no puede colocar el dispositivo, comuníquese con atención al cliente.


- Con la toallita presaturada (húmeda) suministrada, limpie el área de montaje designada y asegúrese de eliminar todo el polvo y otros residuos.
- Con la toallita seca suministrada (etiquetada “PASO 2”), seque completamente el área de montaje designada.
- Retire la tira protectora transparente del velcro suministrado y adhiérala a la ubicación de montaje designada.
- Aplicando una presión moderada, fije el protector en el lugar designado hasta que ambos pares de velcro queden unidos. Verifique que las almohadillas de velcro estén bien sujetas (áreas de superficie completas).
Instalación de Shield
Ejecute todos los pasos especificados en la sección “Instalación de Shield” antes de montar Shield.
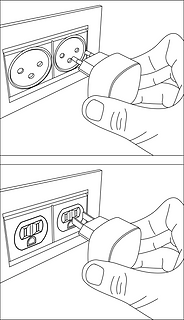
- Select the 5V/2A shield power adapter suitable to your region (EU or US) and connect the supplied 5V/2A shield power adapter to a standard electrical outlet. If your country supports neither adapter, you should locally purchase a compatible 5V, 2A, USB-C adapter. The device can not be powered from USB ports on Stratasys printers which come with such ports.

- Connect the Type C connector (other end of the power adapter) into the power port labelled 5V2A

Wait for the rear SYS LED to start blinking twice every second in red. The device is now powered on and booted up.
Do NOT remove the power cable while the system is booting up.

Conecte el cable Ethernet suministrado al puerto Ethernet de la impresora. (Si la impresora ya tiene un cable Ethernet conectado, deberá desconectarlo antes de este paso). En este punto, la impresora perderá temporalmente la conectividad en las aplicaciones GrabCAD.
Shield is a network device but with a different function than the printer on the one side and a personal computer or server computer on the other side.
So straight through ethernet cables can be used, crossover ethernet cables are not needed.
.png)
- Retire la cubierta antipolvo azul del puerto PRT en el dispositivo Shield. Tome el otro extremo del cable Ethernet (ya conectado al puerto Ethernet de la impresora) y conéctelo al puerto PRT blindado.

.png)
- Retire la cubierta antipolvo del puerto LAN y conecte su cable de red existente (que estaba conectado a la impresora, desenchufado en el paso 4) al puerto LAN de Shield.
.png)

- El dispositivo Shield ahora está conectado a su red y su impresora ahora está conectada al dispositivo Shield. Verifique que los tres enchufes estén asegurados en su lugar. Los cables sueltos o no asegurados pueden causar problemas de conectividad.

Asegúrese de que la impresora esté encendida y verifique que las luces del puerto Ethernet de Shield estén activas.
The LAN and PRT LED lights will not be active.

In 3 minutes, your printer should be discoverable / can be added in GrabCAD Print.
The IP address to use is that of the printer, the Shield is transparent and will not have an IP address of its own.
The Shield Installation is now complete.
Once a Shield is detected for a printer, GrabCAD Print will show a small Shield icon next to the printer.

The printer's Settings will show the Shield configuration information and whether its Firewall is operational.
The red dot on the Shield indicates the firewall has detected network traffic that is not necessary for normal printer operation and which is blocked from reaching (inbound) or leaving (outbound) the printer.

Changing the printer IP address
When using a dynamic IP address the printer will receive an IP address from a DHCP server. This IP is "leased" for a limited period of time and will expire. A typical value is 24 hours.
When the lease needs to be renewed the printer can get either receive the same IP address (your network administrator can arrange for this) or a different IP address.
When using a static IP address for a printer, there can be reasons this address needs to be changed.
Enter the new IP address into the software that's connected to the printer and Shield will continue to operate.
When the printer is configured to broadcast its IP address no action is needed.
Moving Shields between Printers
When a Shield coming from the factory or after a factory reset is first connected to a printer GrabCAD Print desktop will determine the printing technology for that printer (FDM or PolyJet) and pushes the configuration appropriate for that technology to the Shield.
From then on this Shield can be freely connected to other printers of that same technology.
If this Shield needs to be connected to a printer of a different technology, a configuration reset is needed first.
Shield Troubleshooting
When a Shield is connected to a printer following the instructions in the Shield Installation section, but does not appear in GrabCAD Print, the following actions are available.
- to allow GrabCAD Customer Support to assist in diagnosing the problem submit a message through the built-in feedback tool in GrabCAD Print desktop under "Help > Give Software Feedback". Ensure the option to include log files is checked. Describe your problem and click "Send".
- the Shield was previously connected to a printer with a different technology. See the section Moving Shields between printers for steps to remedy.
- the network cable into the Shield or from the Shield to the printer is faulty. Replace the cable(s) to remedy.
- assign a static IP address to your printer instead of a dynamic address through DHCP.
- as a last resort perform a factory reset.
If the problems persist please start a conversation with GrabCAD Customer Support to have your Shield replaced.
Resetting Shield
A Shield can be reset by pressing the "Reset Button" on the side of the Shield.
When the reset button is pressed, the PRT LED (middle LED on the front) will start blinking with a green light.
The following operations are available:
- configuration reset: after 5 seconds the PRT LED will stop blinking and have a continuous green light, and the LAN LED (left hand LED) will start blinking green - if the button is released at this point, the configuration will be reset. The Shield can now be connected to a printer of any supported technology.
- factory reset: after 10 seconds of pressing the reset button, both the PRT and LAN LEDs will be green continuously - if the button is released from this point on, the system will be reset to factory settings. Both the PRT and LAN LEDs will stay continuously green until the factory reset has concluded, and then turn off.

Adaptadores CA/CC y otra información reglamentaria
Modelo: MKA-0502000H (EE. UU.) o MKA-0502000HEUD (UE)
Entrada: 100-240V~, 50/60Hz, 0.4A.
Hecho en China
Fabricante: Shenzhen Merryking Electronics Co., Ltd.
8F, Edificio A, Tianyang 2n Road, Comunidad Oriental, Calle Songgang, Distrito Bao'an, Ciudad de Shenzhen, 518105 Guangdong, República Popular China

El uso del producto está sujeto a la documentación de las pautas del fabricante que puede encontrar aquí.
Certificaciones
Revise las certificaciones de seguridad y cumplimiento de Shield aquí.
Contacto print@grabcad.com por cualquier problema relacionado con la instalación o security@grabcad.com por cualquier inquietud o pregunta relacionada con seguridad.


