Configuration de votre appareil Shield
Table of Contents
Changing the printer IP address
Moving Shields between Printers
ACDC Adapters and other Regulatory Information
Présentation du produit
Shield is a dedicated industrial security appliance developed by Stratasys, that segregates Stratasys printers from the network, monitors network traffic and applies security measures in order to protect the printer, functioning as a dedicated network safeguard for connected assets.
Il s'agit d'un dispositif réseau innovant, autonome et de petite taille, offrant une connectivité hautement sécurisée pour les ressources physiques de grande valeur (comme les imprimantes Stratasys) déployées dans des secteurs industriels verticaux tels que la fabrication, les bâtiments intelligents, l'agriculture et l'énergie. Le Shield protège l'imprimante contre les attaques provenant du réseau et protège le réseau contre les attaques provenant d'un actif potentiellement compromis en isolant et en défendant les deux extrémités.
Deployment of the Shield does not require any modifications or configuration changes to the printer and does not impact customer operations or other security measures. It complements existing security measures, offering defence in depth.
Supported Printers
Shields supports Stratasys FDM and PolyJet 3D printers and can be connected to the following models.
| Technologie d'impression | Printer Family | Printer Model |
| FDM | Série F123 | F120, F170, F270, F370, F770 |
| F123CR Series | F190CR, F370CR | |
| Fortus | Fortus 360mc Small, Fortus 360mc Large, Fortus 380mc, Fortus 380mc Carbon Fiber Edition, Fortus 400mc, Fortus 450mc, Fortus 900mc, F900 | |
| Polyjet | J3/J5 Series | Stratasys J3 DentaJet, Stratasys J35 Pro, Stratasys J5 DentaJet, Stratasys J5 MediJet, Stratasys J55 Prime, Stratasys J55 Pro |
| J7/J8 Series | Stratasys J700 Dental, Stratasys J720 Dental, Stratasys J735, Stratasys J750, Stratasys J750 Digital Anatomy, Stratasys J850,Stratasys J826 Prime, Stratasys J835 Prime, Stratasys J850 Digital Anatomy, Stratasys J850 Prime, Stratasys J850 Prime FabriX, Stratasys J850 Pro, Stratasys J850 TechStyle | |
| J4100 | J4100 |
Moving a Shield between printers is described in the section Moving Shields between Printers.
Compatible software
The following Stratasys software is compatible with Shield:
- GrabCAD Print desktop (both Standard and Pro)
- GrabCAD Print Server
- GrabCAD Control (via GrabCAD Print Server)
- Control Center
- GrabCAD Printer Connectivity API
Managing Shield
A Shield is managed through GrabCAD Print desktop when in possession of a valid GrabCAD Streamline Pro license.
Multiple Shields can be managed at the same time or from different GrabCAD Print desktop installations.
Any updates to a Shield will come bundled with a new GrabCAD Print desktop version, including firmware and shield software.
A Shield will never connect to the internet to fetch updates.
GrabCAD Print desktop will determine if a Shield is in need of an update and will push the update automatically to the Shield, no action from the side of the user is needed.
Liste des composants clés
- Appareil Shield X 1

- Bandes Velcro X 2 (1 bande déjà fixée au Shield)
- Câble Ethernet (pour connecter l'imprimante au Shield) X1

- EU power adapter, 5V/2A with USB type C connector X 1
.png)
- Adaptateur secteur (États-Unis), 5 V/2 A avec connecteur USB Type C X 1
.png)
- Lingette présaturée (humide) pour la préparation au montage X 1
.png)
- Chiffon sec pour la préparation au montage X 1
.png)
Vues du dispositif Shield
%20(1).png)
%20(1).png)
%20(1).png)
Montage du Shield
Please complete all steps specified in the Shield Installation section before mounting the shield.
- Sélectionnez un emplacement de montage spécifique sur le dessus ou sur le côté de l'imprimante, comme indiqué dans les images ci-dessous. Si vous ne parvenez pas à le localiser, veuillez contacter le support client.


- À l'aide de la lingette présaturée (humide) fournie, nettoyez la zone de montage désignée en veillant à éliminer toute la poussière et autres résidus.
- À l'aide du chiffon sec fourni (étiqueté « ÉTAPE 2 »), séchez soigneusement la zone de montage désignée.
- Décollez la bande de protection transparente de la bande Velcro fournie et collez-la à l'emplacement de montage désigné.
- En appliquant une pression modérée, fixez le dispositif de protection à l'emplacement désigné jusqu'à ce que les deux paires de Velcro soient jointes. Vérifiez que les bandes Velcro sont bien fixées (surfaces entières).


Installation du Shield
Veuillez suivre toutes les étapes spécifiées dans la section « Installation du Shield » avant de monter le dispositif.
- Select the 5V/2A shield power adapter suitable to your region (EU or US) and connect the supplied 5V/2A shield power adapter to a standard electrical outlet. If your country supports neither adapter, you should locally purchase a compatible 5V, 2A, USB-C adapter. The device can not be powered from USB ports on Stratasys printers which come with such ports.

- Connect the Type C connector (other end of the power adapter) into the power port labelled 5V2A

Wait for the rear SYS LED to start blinking twice every second in red. The device is now powered on and booted up.
Do NOT remove the power cable while the system is booting up.

Branchez le câble Ethernet fourni sur le port Ethernet de l'imprimante. (Si l'imprimante est déjà équipée d'un câble Ethernet branché, vous devrez le débrancher avant cette étape). À ce stade, l'imprimante perdra temporairement la connectivité dans les applications GrabCAD.
Shield is a network device but with a different function than the printer on the one side and a personal computer or server computer on the other side.
So straight through ethernet cables can be used, crossover ethernet cables are not needed.
.png)
- Retirez le cache de protection anti-poussière bleu du port PRT sur l’appareil Shield. Prenez l'autre extrémité du câble Ethernet (déjà branché sur le port Ethernet de l'imprimante) et branchez-la sur le port PRT du bouclier.

.png)
- Retirez le cache anti-poussière noir de protection du port du réseau local et connectez votre câble réseau existant (qui était connecté à l'imprimante, débranché à l'étape 4) au port du réseau local du Shield.
.png)

- Le dispositif Shield est maintenant connecté à votre réseau et votre imprimante est désormais connectée au dispositif Shield. Vérifiez que les trois fiches sont bien en place. Des câbles lâches ou non sécurisés peuvent entraîner des problèmes de connectivité.

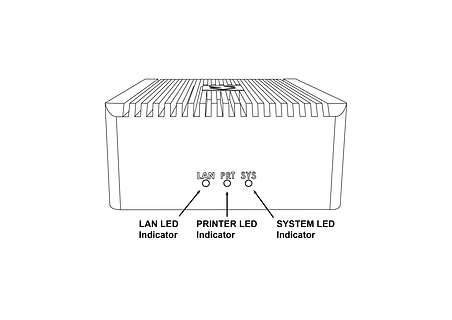
Assurez-vous que l'imprimante est allumée et vérifiez que les voyants du port Ethernet du Shield de protection sont actifs.
The LAN and PRT LED lights will not be active.

In 3 minutes, your printer should be discoverable / can be added in GrabCAD Print.
The IP address to use is that of the printer, the Shield is transparent and will not have an IP address of its own.
The Shield Installation is now complete.
Once a Shield is detected for a printer, GrabCAD Print will show a small Shield icon next to the printer.

The printer's Settings will show the Shield configuration information and whether its Firewall is operational.
The red dot on the Shield indicates the firewall has detected network traffic that is not necessary for normal printer operation and which is blocked from reaching (inbound) or leaving (outbound) the printer.


Changing the printer IP address
When using a dynamic IP address the printer will receive an IP address from a DHCP server. This IP is "leased" for a limited period of time and will expire. A typical value is 24 hours.
When the lease needs to be renewed the printer can get either receive the same IP address (your network administrator can arrange for this) or a different IP address.
When using a static IP address for a printer, there can be reasons this address needs to be changed.
Enter the new IP address into the software that's connected to the printer and Shield will continue to operate.
When the printer is configured to broadcast its IP address no action is needed.
Moving Shields between Printers
When a Shield coming from the factory or after a factory reset is first connected to a printer GrabCAD Print desktop will determine the printing technology for that printer (FDM or PolyJet) and pushes the configuration appropriate for that technology to the Shield.
From then on this Shield can be freely connected to other printers of that same technology.
If this Shield needs to be connected to a printer of a different technology, a configuration reset is needed first.
Shield Troubleshooting
When a Shield is connected to a printer following the instructions in the Shield Installation section, but does not appear in GrabCAD Print, the following actions are available.
- to allow GrabCAD Customer Support to assist in diagnosing the problem submit a message through the built-in feedback tool in GrabCAD Print desktop under "Help > Give Software Feedback". Ensure the option to include log files is checked. Describe your problem and click "Send".
- the Shield was previously connected to a printer with a different technology. See the section Moving Shields between printers for steps to remedy.
- the network cable into the Shield or from the Shield to the printer is faulty. Replace the cable(s) to remedy.
- assign a static IP address to your printer instead of a dynamic address through DHCP.
- as a last resort perform a factory reset.
If the problems persist please start a conversation with GrabCAD Customer Support to have your Shield replaced.
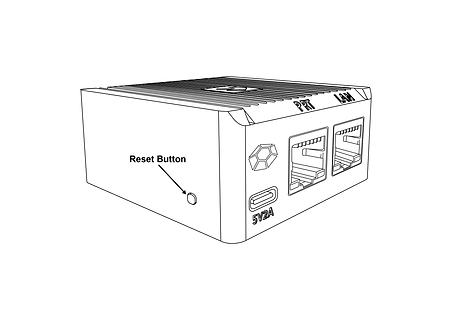
Resetting Shield
A Shield can be reset by pressing the "Reset Button" on the side of the Shield.
When the reset button is pressed, the PRT LED (middle LED on the front) will start blinking with a green light.
The following operations are available:
- configuration reset: after 5 seconds the PRT LED will stop blinking and have a continuous green light, and the LAN LED (left hand LED) will start blinking green - if the button is released at this point, the configuration will be reset. The Shield can now be connected to a printer of any supported technology.
- factory reset: after 10 seconds of pressing the reset button, both the PRT and LAN LEDs will be green continuously - if the button is released from this point on, the system will be reset to factory settings. Both the PRT and LAN LEDs will stay continuously green until the factory reset has concluded, and then turn off.

Adaptateurs CA/CC et autres informations réglementaires
Modèle : MKA-0502000H (États-Unis) ou MKA-0502000HEUD (UE)
Entrée : 100-240 V~, 50/60 Hz, 0.4 A.
Fabriqué en Chine
Fabricant : Shenzhen Merryking Electronics Co., Ltd.
8F, Building A, Tianyang 2n Road, Oriental Community, Songgang Street, Bao’an District, Shenzhen City, 518105 Guangdong, République populaire de Chine

L'utilisation du produit est soumise aux directives du fabricant disponibles dans la documentation ici.
Certifications
Consultez les certifications de conformité et de sécurité du Shield ici.
Contactez print@grabcad.com pour tout problème lié à l'installation ou security@grabcad.com pour toute préoccupation ou question relative à la sécurité.