Configurazione del dispositivo Shield
Table of Contents
Changing the printer IP address
Moving Shields between Printers
ACDC Adapters and other Regulatory Information
Panoramica del prodotto
Shield is a dedicated industrial security appliance developed by Stratasys, that segregates Stratasys printers from the network, monitors network traffic and applies security measures in order to protect the printer, functioning as a dedicated network safeguard for connected assets.
Si tratta di un dispositivo di rete innovativo, autonomo e di dimensioni palmari, che fornisce una connettività altamente protetta per beni fisici di alto valore (come le stampanti Stratasys) utilizzati in settori verticali industriali come la produzione, gli impianti intelligenti, l'agricoltura e l'energia. Shield protegge la stampante dagli attacchi provenienti dalla rete e protegge la rete dagli attacchi provenienti da un asset potenzialmente compromesso, isolando e difendendo entrambe le estremità.
Deployment of the Shield does not require any modifications or configuration changes to the printer and does not impact customer operations or other security measures. It complements existing security measures, offering defence in depth.
Supported Printers
Shields supports Stratasys FDM and PolyJet 3D printers and can be connected to the following models.
| Tecnologia di stampa | Printer Family | Printer Model |
| FDM | Serie F123 | F120, F170, F270, F370, F770 |
| F123CR Series | F190CR, F370CR | |
| Fortus | Fortus 360mc Small, Fortus 360mc Large, Fortus 380mc, Fortus 380mc Carbon Fiber Edition, Fortus 400mc, Fortus 450mc, Fortus 900mc, F900 | |
| POLYJET | J3/J5 Series | Stratasys J3 DentaJet, Stratasys J35 Pro, Stratasys J5 DentaJet, Stratasys J5 MediJet, Stratasys J55 Prime, Stratasys J55 Pro |
| J7/J8 Series | Stratasys J700 Dental, Stratasys J720 Dental, Stratasys J735, Stratasys J750, Stratasys J750 Digital Anatomy, Stratasys J850,Stratasys J826 Prime, Stratasys J835 Prime, Stratasys J850 Digital Anatomy, Stratasys J850 Prime, Stratasys J850 Prime FabriX, Stratasys J850 Pro, Stratasys J850 TechStyle | |
| J4100 | J4100 |
Moving a Shield between printers is described in the section Moving Shields between Printers.
Compatible software
The following Stratasys software is compatible with Shield:
- GrabCAD Print desktop (both Standard and Pro)
- GrabCAD Print Server
- GrabCAD Control (via GrabCAD Print Server)
- Control Center
- GrabCAD Printer Connectivity API
Managing Shield
A Shield is managed through GrabCAD Print desktop when in possession of a valid GrabCAD Streamline Pro license.
Multiple Shields can be managed at the same time or from different GrabCAD Print desktop installations.
Any updates to a Shield will come bundled with a new GrabCAD Print desktop version, including firmware and shield software.
A Shield will never connect to the internet to fetch updates.
GrabCAD Print desktop will determine if a Shield is in need of an update and will push the update automatically to the Shield, no action from the side of the user is needed.
Elenco dei componenti chiave
- Dispositivo Shield X 1

- Cuscinetti in Velcro X 2 (cuscinetto 1 già attaccato a Shield)
- Cavo Ethernet (per collegare la stampante a Shield) X1

- EU power adapter, 5V/2A with USB type C connector X 1
.png)
- Adattatore di alimentazione USA, 5V/2A con connettore USB tipo C X 1
.png)
- Salvietta presaturata (umida) per la preparazione al montaggio X 1
.png)
- Panno asciutto per la preparazione al montaggio X 1
.png)
Viste del dispositivo Shield
%20(1).png)
%20(1).png)
%20(1).png)
Montaggio di Shield
Please complete all steps specified in the Shield Installation section before mounting the shield.
- Selezionare una posizione di montaggio specifica sulla parte superiore o laterale della stampante, come mostrato nelle immagini sottostanti. Se non si riesce a individuarla, contattare l'assistenza clienti.


- Utilizzando il panno presaturato (umido) in dotazione, pulire l'area di montaggio designata assicurandosi di rimuovere tutta la polvere e altri residui.
- Utilizzando la salvietta asciutta in dotazione (etichettata come "PASSAGGIO 2"), asciugare accuratamente l'area di montaggio designata.
- Staccare la striscia protettiva trasparente dal velcro in dotazione e farla aderire alla posizione di montaggio designata.
- Applicando una pressione moderata, fissare lo Shield nella posizione prevista fino a quando entrambe le coppie di velcro sono unite. Verificare che i cuscinetti in velcro siano fissati saldamente (su tutta la superficie).


Installazione di Shield
Prima di montare Shield, completare tutti i passaggi specificati nella sezione "Installazione di Shield".
- Select the 5V/2A shield power adapter suitable to your region (EU or US) and connect the supplied 5V/2A shield power adapter to a standard electrical outlet. If your country supports neither adapter, you should locally purchase a compatible 5V, 2A, USB-C adapter. The device can not be powered from USB ports on Stratasys printers which come with such ports.

- Connect the Type C connector (other end of the power adapter) into the power port labelled 5V2A

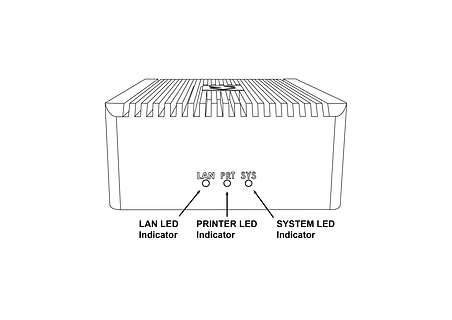
Wait for the rear SYS LED to start blinking twice every second in red. The device is now powered on and booted up.
Do NOT remove the power cable while the system is booting up.

Collegare il cavo Ethernet in dotazione alla porta Ethernet della stampante. (Se la stampante ha già un cavo Ethernet collegato, è necessario scollegarlo prima di questa fase). A questo punto, la stampante perderà temporaneamente la connettività con GrabCAD Apps.
Shield is a network device but with a different function than the printer on the one side and a personal computer or server computer on the other side.
So straight through ethernet cables can be used, crossover ethernet cables are not needed.
.png)
- Rimuovere il coperchio protettivo blu dalla porta PRT del dispositivo Shield. Prendete l'altra estremità del cavo Ethernet (già collegata alla porta Ethernet della stampante) e collegatela alla porta PRT dello Shield.

.png)
- Rimuovere il coperchio nero protettivo dalla porta LAN e collegare il cavo di rete esistente (che era collegato alla stampante, scollegata al passaggio 4) alla porta LAN dello Shield.
.png)

- Il dispositivo Shield è ora collegato alla rete e la stampante è ora collegata al dispositivo Shield. Verificare che tutti e tre i connettori siano fissati in posizione. I cavi allentati o non fissati possono causare problemi di connettività.

Accertarsi che la stampante sia accesa e verificare che le spie della porta Ethernet Shield siano attive.
The LAN and PRT LED lights will not be active.

In 3 minutes, your printer should be discoverable / can be added in GrabCAD Print.
The IP address to use is that of the printer, the Shield is transparent and will not have an IP address of its own.
The Shield Installation is now complete.
Once a Shield is detected for a printer, GrabCAD Print will show a small Shield icon next to the printer.

The printer's Settings will show the Shield configuration information and whether its Firewall is operational.
The red dot on the Shield indicates the firewall has detected network traffic that is not necessary for normal printer operation and which is blocked from reaching (inbound) or leaving (outbound) the printer.


Changing the printer IP address
When using a dynamic IP address the printer will receive an IP address from a DHCP server. This IP is "leased" for a limited period of time and will expire. A typical value is 24 hours.
When the lease needs to be renewed the printer can get either receive the same IP address (your network administrator can arrange for this) or a different IP address.
When using a static IP address for a printer, there can be reasons this address needs to be changed.
Enter the new IP address into the software that's connected to the printer and Shield will continue to operate.
When the printer is configured to broadcast its IP address no action is needed.
Moving Shields between Printers
When a Shield coming from the factory or after a factory reset is first connected to a printer GrabCAD Print desktop will determine the printing technology for that printer (FDM or PolyJet) and pushes the configuration appropriate for that technology to the Shield.
From then on this Shield can be freely connected to other printers of that same technology.
If this Shield needs to be connected to a printer of a different technology, a configuration reset is needed first.
Shield Troubleshooting
When a Shield is connected to a printer following the instructions in the Shield Installation section, but does not appear in GrabCAD Print, the following actions are available.
- to allow GrabCAD Customer Support to assist in diagnosing the problem submit a message through the built-in feedback tool in GrabCAD Print desktop under "Help > Give Software Feedback". Ensure the option to include log files is checked. Describe your problem and click "Send".
- the Shield was previously connected to a printer with a different technology. See the section Moving Shields between printers for steps to remedy.
- the network cable into the Shield or from the Shield to the printer is faulty. Replace the cable(s) to remedy.
- assign a static IP address to your printer instead of a dynamic address through DHCP.
- as a last resort perform a factory reset.
If the problems persist please start a conversation with GrabCAD Customer Support to have your Shield replaced.
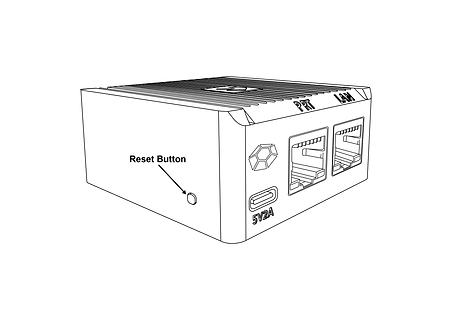
Resetting Shield
A Shield can be reset by pressing the "Reset Button" on the side of the Shield.
When the reset button is pressed, the PRT LED (middle LED on the front) will start blinking with a green light.
The following operations are available:
- configuration reset: after 5 seconds the PRT LED will stop blinking and have a continuous green light, and the LAN LED (left hand LED) will start blinking green - if the button is released at this point, the configuration will be reset. The Shield can now be connected to a printer of any supported technology.
- factory reset: after 10 seconds of pressing the reset button, both the PRT and LAN LEDs will be green continuously - if the button is released from this point on, the system will be reset to factory settings. Both the PRT and LAN LEDs will stay continuously green until the factory reset has concluded, and then turn off.

Adattatori CA/CC e altre informazioni normative
Modello: MKA-0502000H (USA) o MKA-0502000HEUD (UE)
Ingresso: 100-240V~, 50/60Hz, 0.4A.
Prodotto in Cina
Produttore: Shenzhen Merryking Electronics Co., Ltd.
8F, Building A, Tianyang 2n Road, Oriental Community, Songgang Street, Bao’an District, Shenzhen City, 518105 Guangdong, Cina

L'uso del prodotto è soggetto alla documentazione delle linee guida del produttore che può essere trovata qui.
Certificazioni
Le certificazioni di conformità e sicurezza di Shield sono disponibili qui.
Contattare print@grabcad.com per eventuali problemi relativi all'installazione o security@grabcad.com per qualsiasi dubbio o domanda relativa alla sicurezza.