シールド デバイスの設定
Table of Contents
Changing the printer IP address
Moving Shields between Printers
ACDC Adapters and other Regulatory Information
製品概要
Shield is a dedicated industrial security appliance developed by Stratasys, that segregates Stratasys printers from the network, monitors network traffic and applies security measures in order to protect the printer, functioning as a dedicated network safeguard for connected assets.
これは、製造、スマート施設、農業、エネルギーなどの産業分野で導入されている高価値の物理資産(Stratasys プリンターなど)に、高度に安全な接続を提供する、革新的なスタンドアロンの手のひらサイズネットワーク デバイスです。シールドは、両端を分離して防御することで、ネットワークからの攻撃に対してプリンターを保護し、侵害の可能性がある資産からの攻撃に対してネットワークを保護します。
Deployment of the Shield does not require any modifications or configuration changes to the printer and does not impact customer operations or other security measures. It complements existing security measures, offering defence in depth.
Supported Printers
Shields supports Stratasys FDM and PolyJet 3D printers and can be connected to the following models.
| 造形方式 | Printer Family | Printer Model |
| FDM | F123 シリーズ | F120, F170, F270, F370, F770 |
| F123CR Series | F190CR, F370CR | |
| Fortus | Fortus 360mc Small, Fortus 360mc Large, Fortus 380mc, Fortus 380mc Carbon Fiber Edition, Fortus 400mc, Fortus 450mc, Fortus 900mc, F900 | |
| Polyjet | J3/J5 Series | Stratasys J3 DentaJet, Stratasys J35 Pro, Stratasys J5 DentaJet, Stratasys J5 MediJet, Stratasys J55 Prime, Stratasys J55 Pro |
| J7/J8 Series | Stratasys J700 Dental, Stratasys J720 Dental, Stratasys J735, Stratasys J750, Stratasys J750 Digital Anatomy, Stratasys J850,Stratasys J826 Prime, Stratasys J835 Prime, Stratasys J850 Digital Anatomy, Stratasys J850 Prime, Stratasys J850 Prime FabriX, Stratasys J850 Pro, Stratasys J850 TechStyle | |
| J4100 | J4100 |
Moving a Shield between printers is described in the section Moving Shields between Printers.
Compatible software
The following Stratasys software is compatible with Shield:
- GrabCAD Print desktop (both Standard and Pro)
- GrabCAD Print Server
- GrabCAD Control (via GrabCAD Print Server)
- Control Center
- GrabCAD Printer Connectivity API
Managing Shield
A Shield is managed through GrabCAD Print desktop when in possession of a valid GrabCAD Streamline Pro license.
Multiple Shields can be managed at the same time or from different GrabCAD Print desktop installations.
Any updates to a Shield will come bundled with a new GrabCAD Print desktop version, including firmware and shield software.
A Shield will never connect to the internet to fetch updates.
GrabCAD Print desktop will determine if a Shield is in need of an update and will push the update automatically to the Shield, no action from the side of the user is needed.
主要コンポーネントのリスト
- シールド デバイス X 1

- Velcro パッド X 2(1 パッドはシールドに取り付け済み)
- イーサネットケーブル(プリンターとシールドを接続するため)X 1

- EU power adapter, 5V/2A with USB type C connector X 1
.png)
- 米国電源アダプター、5 V/2 A、USB タイプ C コネクタ付き X 1
.png)
- マウント準備用の濡れ布巾 X 1
.png)
- マウント準備用の乾燥布巾 X 1
.png)
シールド デバイス ビュー
%20(1).png)
%20(1).png)
%20(1).png)
シールドの取り付け
Please complete all steps specified in the Shield Installation section before mounting the shield.
- 以下の画像に示すように、プリンターの上部または側部の特定の取り付け場所を選択します。見つからない場合は、カスタマーサポートにお問い合わせください。


- 付属の濡れ布巾を使用して、指定された取り付け領域を掃除し、ほこりやその他の残留物をしっかりと取り除きます。
- 付属の乾燥布巾(「STEP 2」のラベル付き)を使用して、指定された取り付け領域を完全に乾かします。
- 付属の Velcro から保護用透明テープを剥がして、指定された取り付け位置に貼り付けます。
- 適度な圧力をかけ、両方の Velcro のペアが互いにくっつくまで、シールドを指定された場所に固定します。Velcro パッドが、しっかりと表面全体に貼りついていることを確認します。


シールドの設置
シールドを取り付ける前に、「シールドの設置」セクションに記載されている、すべての手順を完了してください。
- Select the 5V/2A shield power adapter suitable to your region (EU or US) and connect the supplied 5V/2A shield power adapter to a standard electrical outlet. If your country supports neither adapter, you should locally purchase a compatible 5V, 2A, USB-C adapter. The device can not be powered from USB ports on Stratasys printers which come with such ports.

- Connect the Type C connector (other end of the power adapter) into the power port labelled 5V2A

Wait for the rear SYS LED to start blinking twice every second in red. The device is now powered on and booted up.
Do NOT remove the power cable while the system is booting up.

付属のイーサネット ケーブルをプリンターのイーサネット ポートに差し込みます(プリンターにすでにイーサネット ケーブルが差し込まれている場合は、この手順を実行する前に、抜く必要があります)。この時点で、プリンターは、GrabCAD アプリで一時的に接続を失います。
Shield is a network device but with a different function than the printer on the one side and a personal computer or server computer on the other side.
So straight through ethernet cables can be used, crossover ethernet cables are not needed.
.png)
- シールド デバイスの PRT ポートから、青い保護ダスト カバーを取り外します。イーサネット ケーブルのもう一方の端(プリンターのイーサネット ポートに差し込み済み)をシールドの PRT ポートに差し込みます。

.png)
- LAN ポートから黒い保護ダスト カバーを取り外し、既存のネットワーク ケーブル(手順 4 で取り外したプリンターに接続されていたもの)をシールドの LAN ポートにつなぎます。
.png)

- これで、シールド デバイスがネットワークに接続され、プリンターがシールド デバイスに接続されます。3 個のプラグがすべて所定の位置に固定されていることを確認してください。ケーブルが緩んでいたり固定されていなかったりすると、接続の問題が発生する可能性があります。

プリンターの電源がオンになっていること、シールド イーサネット ポートのライトが点灯していることを確認します。
The LAN and PRT LED lights will not be active.

In 3 minutes, your printer should be discoverable / can be added in GrabCAD Print.
The IP address to use is that of the printer, the Shield is transparent and will not have an IP address of its own.
The Shield Installation is now complete.
Once a Shield is detected for a printer, GrabCAD Print will show a small Shield icon next to the printer.

The printer's Settings will show the Shield configuration information and whether its Firewall is operational.
The red dot on the Shield indicates the firewall has detected network traffic that is not necessary for normal printer operation and which is blocked from reaching (inbound) or leaving (outbound) the printer.


Changing the printer IP address
When using a dynamic IP address the printer will receive an IP address from a DHCP server. This IP is "leased" for a limited period of time and will expire. A typical value is 24 hours.
When the lease needs to be renewed the printer can get either receive the same IP address (your network administrator can arrange for this) or a different IP address.
When using a static IP address for a printer, there can be reasons this address needs to be changed.
Enter the new IP address into the software that's connected to the printer and Shield will continue to operate.
When the printer is configured to broadcast its IP address no action is needed.
Moving Shields between Printers
When a Shield coming from the factory or after a factory reset is first connected to a printer GrabCAD Print desktop will determine the printing technology for that printer (FDM or PolyJet) and pushes the configuration appropriate for that technology to the Shield.
From then on this Shield can be freely connected to other printers of that same technology.
If this Shield needs to be connected to a printer of a different technology, a configuration reset is needed first.
Shield Troubleshooting
When a Shield is connected to a printer following the instructions in the Shield Installation section, but does not appear in GrabCAD Print, the following actions are available.
- to allow GrabCAD Customer Support to assist in diagnosing the problem submit a message through the built-in feedback tool in GrabCAD Print desktop under "Help > Give Software Feedback". Ensure the option to include log files is checked. Describe your problem and click "Send".
- the Shield was previously connected to a printer with a different technology. See the section Moving Shields between printers for steps to remedy.
- the network cable into the Shield or from the Shield to the printer is faulty. Replace the cable(s) to remedy.
- assign a static IP address to your printer instead of a dynamic address through DHCP.
- as a last resort perform a factory reset.
If the problems persist please start a conversation with GrabCAD Customer Support to have your Shield replaced.
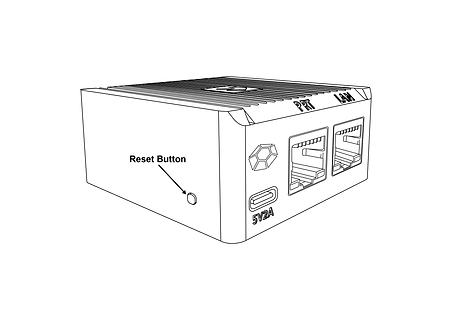
Resetting Shield
A Shield can be reset by pressing the "Reset Button" on the side of the Shield.
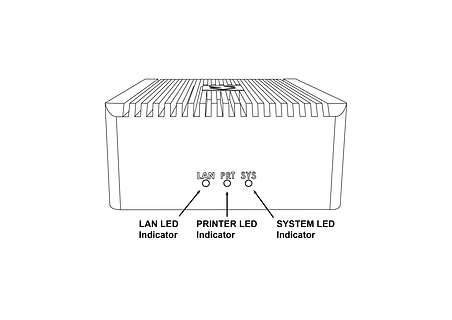
When the reset button is pressed, the PRT LED (middle LED on the front) will start blinking with a green light.
The following operations are available:
- configuration reset: after 5 seconds the PRT LED will stop blinking and have a continuous green light, and the LAN LED (left hand LED) will start blinking green - if the button is released at this point, the configuration will be reset. The Shield can now be connected to a printer of any supported technology.
- factory reset: after 10 seconds of pressing the reset button, both the PRT and LAN LEDs will be green continuously - if the button is released from this point on, the system will be reset to factory settings. Both the PRT and LAN LEDs will stay continuously green until the factory reset has concluded, and then turn off.

AC/DC アダプターおよびその他の規制情報
モデル: MKA-0502000H(米国)または MKA-0502000HEUD(EU)
入力: 100-240 V~、50/60 Hz、0.4 A。
中国製
製造元: 深圳市鉅博電子有限公司
中国518105広東省深圳市宝安区松崗街道東方社区田洋2路南辺頭科技園A棟8楼

製品の使用については、こちらの製造元のガイドライン文書に従う必要があります。
証明書
シールドのコンプライアンスおよびセキュリティ認証については、こちらをご覧ください。
設置関連の問題についてはprint@grabcad.comに、セキュリティ関連の懸念やご不明な点についてはsecurity@grabcad.comに、お問い合わせください。