設定 Shield 裝置
Table of Contents
Changing the printer IP address
Moving Shields between Printers
ACDC Adapters and other Regulatory Information
產品概覽
Shield is a dedicated industrial security appliance developed by Stratasys, that segregates Stratasys printers from the network, monitors network traffic and applies security measures in order to protect the printer, functioning as a dedicated network safeguard for connected assets.
這是一款創新、獨立、手掌大小的網路裝置,為部署在製造業、智慧設施、農業和能源等垂直行業的高價值實體資產 (如 Stratasys 印表機) 提供高度安全的連線。Shield 可保護印表機免受來自網路的攻擊,並透過隔離和防禦兩端來保護網路免受來自潛在受損資產的攻擊。
Deployment of the Shield does not require any modifications or configuration changes to the printer and does not impact customer operations or other security measures. It complements existing security measures, offering defence in depth.
Supported Printers
Shields supports Stratasys FDM and PolyJet 3D printers and can be connected to the following models.
| 列印技術 | Printer Family | Printer Model |
| FDM | F123 系列 | F120, F170, F270, F370, F770 |
| F123CR Series | F190CR, F370CR | |
| Fortus | Fortus 360mc Small, Fortus 360mc Large, Fortus 380mc, Fortus 380mc Carbon Fiber Edition, Fortus 400mc, Fortus 450mc, Fortus 900mc, F900 | |
| PolyJet的 | J3/J5 Series | Stratasys J3 DentaJet, Stratasys J35 Pro, Stratasys J5 DentaJet, Stratasys J5 MediJet, Stratasys J55 Prime, Stratasys J55 Pro |
| J7/J8 Series | Stratasys J700 Dental, Stratasys J720 Dental, Stratasys J735, Stratasys J750, Stratasys J750 Digital Anatomy, Stratasys J850,Stratasys J826 Prime, Stratasys J835 Prime, Stratasys J850 Digital Anatomy, Stratasys J850 Prime, Stratasys J850 Prime FabriX, Stratasys J850 Pro, Stratasys J850 TechStyle | |
| J4100 | J4100 |
Moving a Shield between printers is described in the section Moving Shields between Printers.
Compatible software
The following Stratasys software is compatible with Shield:
- GrabCAD Print desktop (both Standard and Pro)
- GrabCAD Print Server
- GrabCAD Control (via GrabCAD Print Server)
- Control Center
- GrabCAD Printer Connectivity API
Managing Shield
A Shield is managed through GrabCAD Print desktop when in possession of a valid GrabCAD Streamline Pro license.
Multiple Shields can be managed at the same time or from different GrabCAD Print desktop installations.
Any updates to a Shield will come bundled with a new GrabCAD Print desktop version, including firmware and shield software.
A Shield will never connect to the internet to fetch updates.
GrabCAD Print desktop will determine if a Shield is in need of an update and will push the update automatically to the Shield, no action from the side of the user is needed.
關鍵元件清單
- Shield 裝置 X 1

- Velcro 墊 X 2 (1 墊已連接至 Shield)
- 乙太網路線 (用於將印表機連接到 Shield) X1

- EU power adapter, 5V/2A with USB type C connector X 1
.png)
- 美國電源轉接器,5V/2A,USB C 型接頭 X 1
.png)
- 準備架置時使用的濕拭巾 (已預先吸飽) X 1
.png)
- 準備架置時使用的乾拭巾 X 1
.png)
Shield 裝置視圖
%20(1).png)
%20(1).png)
%20(1).png)
Shield 架置
Please complete all steps specified in the Shield Installation section before mounting the shield.
- 在印表機頂部或側面選擇特定的架置位置,如下圖所示。如果您找不到,請聯絡客戶支援。


- 使用隨附的濕拭巾 (已預先吸飽) 清潔指定的架置區域,以確保清除所有的灰塵和其他殘留物。
- 使用隨附的乾拭巾 (標有「STEP 2」),徹底擦乾指定的架置區域。
- 將隨附 Velcro 墊上的透明保護條撕下,並貼到指定的架置位置。
- 施加適度的壓力,將 Shield 固定在指定位置,直到兩個 Velcro 貼連接在一起。確認 Velcro 貼牢固貼緊 (整個表面區域)。


Shield 安裝
在安裝 Shield 之前,請先完成「Shield 安裝」一節中指定的所有步驟
- Select the 5V/2A shield power adapter suitable to your region (EU or US) and connect the supplied 5V/2A shield power adapter to a standard electrical outlet. If your country supports neither adapter, you should locally purchase a compatible 5V, 2A, USB-C adapter. The device can not be powered from USB ports on Stratasys printers which come with such ports.

- Connect the Type C connector (other end of the power adapter) into the power port labelled 5V2A

Wait for the rear SYS LED to start blinking twice every second in red. The device is now powered on and booted up.
Do NOT remove the power cable while the system is booting up.

將隨附的乙太網路線插入印表機的乙太網路連接埠。(如果印表機已插入乙太網路電纜,則需要在執行此步驟之前將其拔出)。此時,印表機將暫時失去 GrabCAD 應用程式中的連線。
Shield is a network device but with a different function than the printer on the one side and a personal computer or server computer on the other side.
So straight through ethernet cables can be used, crossover ethernet cables are not needed.
.png)
- 取下 Shield 裝置 PRT 連接埠中的藍色防塵罩。拿著乙太網纜線 (已插入印表機的乙太網路連接埠) 的另一端,將其插入 Shield PRT 連接埠。

.png)
- 取下 LAN 連接埠中的黑色防塵蓋,並將現有的網路纜線 (與印表機連接,但在步驟 4 中拔下) 連接到 Shield 的 LAN 連接埠。
.png)

- 現在 Shield 裝置已連接到您的網路,您的印表機也與 Shield 裝置連接。請確認三個插頭全部牢固地插入。鬆動或不牢固的纜線可能會導致連接問題。

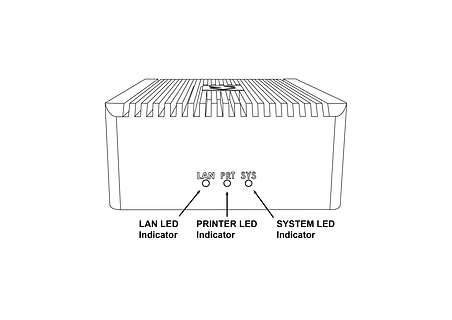
確保印表機已開啟,確認 Shield 乙太網路連接埠指示燈處於作用中狀態。
The LAN and PRT LED lights will not be active.

In 3 minutes, your printer should be discoverable / can be added in GrabCAD Print.
The IP address to use is that of the printer, the Shield is transparent and will not have an IP address of its own.
The Shield Installation is now complete.
Once a Shield is detected for a printer, GrabCAD Print will show a small Shield icon next to the printer.

The printer's Settings will show the Shield configuration information and whether its Firewall is operational.
The red dot on the Shield indicates the firewall has detected network traffic that is not necessary for normal printer operation and which is blocked from reaching (inbound) or leaving (outbound) the printer.


Changing the printer IP address
When using a dynamic IP address the printer will receive an IP address from a DHCP server. This IP is "leased" for a limited period of time and will expire. A typical value is 24 hours.
When the lease needs to be renewed the printer can get either receive the same IP address (your network administrator can arrange for this) or a different IP address.
When using a static IP address for a printer, there can be reasons this address needs to be changed.
Enter the new IP address into the software that's connected to the printer and Shield will continue to operate.
When the printer is configured to broadcast its IP address no action is needed.
Moving Shields between Printers
When a Shield coming from the factory or after a factory reset is first connected to a printer GrabCAD Print desktop will determine the printing technology for that printer (FDM or PolyJet) and pushes the configuration appropriate for that technology to the Shield.
From then on this Shield can be freely connected to other printers of that same technology.
If this Shield needs to be connected to a printer of a different technology, a configuration reset is needed first.
Shield Troubleshooting
When a Shield is connected to a printer following the instructions in the Shield Installation section, but does not appear in GrabCAD Print, the following actions are available.
- to allow GrabCAD Customer Support to assist in diagnosing the problem submit a message through the built-in feedback tool in GrabCAD Print desktop under "Help > Give Software Feedback". Ensure the option to include log files is checked. Describe your problem and click "Send".
- the Shield was previously connected to a printer with a different technology. See the section Moving Shields between printers for steps to remedy.
- the network cable into the Shield or from the Shield to the printer is faulty. Replace the cable(s) to remedy.
- assign a static IP address to your printer instead of a dynamic address through DHCP.
- as a last resort perform a factory reset.
If the problems persist please start a conversation with GrabCAD Customer Support to have your Shield replaced.
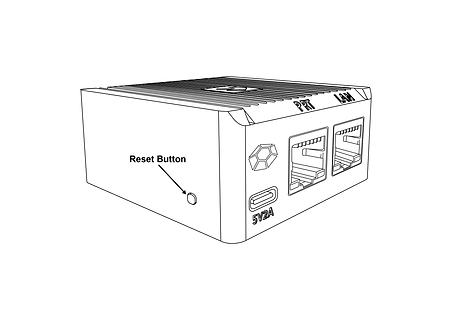
Resetting Shield
A Shield can be reset by pressing the "Reset Button" on the side of the Shield.
When the reset button is pressed, the PRT LED (middle LED on the front) will start blinking with a green light.
The following operations are available:
- configuration reset: after 5 seconds the PRT LED will stop blinking and have a continuous green light, and the LAN LED (left hand LED) will start blinking green - if the button is released at this point, the configuration will be reset. The Shield can now be connected to a printer of any supported technology.
- factory reset: after 10 seconds of pressing the reset button, both the PRT and LAN LEDs will be green continuously - if the button is released from this point on, the system will be reset to factory settings. Both the PRT and LAN LEDs will stay continuously green until the factory reset has concluded, and then turn off.

AC/DC 轉接器與其他法規資訊
型號:MKA-0502000H (美國) 或 MKA-0502000HEUD (歐盟)
輸入:100-240V~,50/60Hz,0.4A。
中國製造
製造商:深圳市鉅博電子有限公司
8F,A 棟,天陽 2 路,東方社區,松崗街,寶安區,深圳市,518105 中國廣東省

產品的使用受製造商指導方針文件 (位於這裡) 的約束。
認證
在這裡檢視 Shield 的合規性與安全性認證。
任何與安裝相關的問題,請聯絡 print@grabcad.com,任何安全性相關的疑慮或問題,請聯絡 security@grabcad.com。