Adjusting FDM print settings
Basic Settings:
Advanced Settings:
The available settings depend on the printer model, the material selected, and the file format of the selected model. Settings dependent on file format and material will be noted in their descriptions, but the settings dependent on printer are split into Basic and Advanced sections below.
Basic Settings
These settings are available for all supported FDM printers. For uPrint and Dimension printers, only these basic settings are available, but for other printers, advanced settings are also available. Jump to section.
Tray Settings
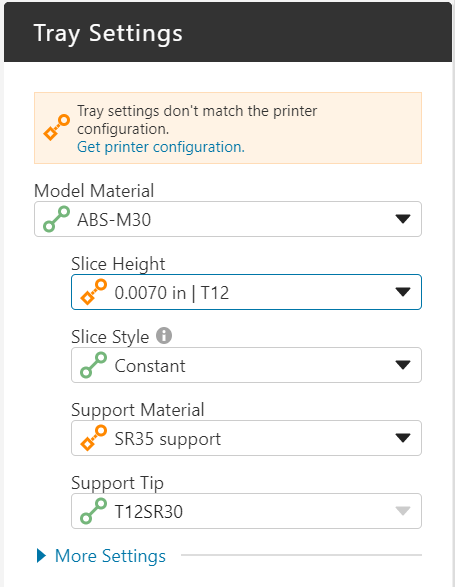
These properties must be the same for all models on a tray. When you select a real printer and not a template printer, the settings from the printer will fill the values here, and a green icon will indicate that the settings match those of the printer.

Slice Height
The available options for slice height depend on the selected printer. To learn more about slice heights, read more here.
Model Material and Support Material
Consult stratasys.com for more information on materials available for your printer.
Model and Support Tip
Some printers require different tips for certain print settings.
Model Settings
These properties can be changed for individual parts on the tray. Select models with left-click, either in the 3D viewer or the models list in the Project Panel. Add to your selection with ctrl+click.

Part Fill Style
To learn about the different styles, read more here.
Support Settings

Support Style
To learn about the different styles, read more here.
Use Model Material
This allows the support structure to be printed using mostly model material, with a few layers of support material where the support structure meets the model. This reduces the amount of time the job spends switching between support and model material each layer.
The Stratasys F3300 printer supports more than one model material for a tray. When multiple model materials are set up the material used for supports may be selected. By default the material assigned to the model is the material assigned to Model as Support.
An additional checkbox changes the infill of the generated support structure to be higher density and without a boundary contour.
Grow Supports
Grow Supports improves the stability of supports by creating increasingly wider supports further below the model. However, this may create unneeded supports for some models, such as in the example pictured below.
| Do Not Grow Supports | Grow Small Supports Only |
|
|
Self-supporting Angle
Supports are generated wherever the angle of the part surface drops below a specified value, known as the self-supporting angle, and it can be adjusted here. You can increase or decrease the amount of supports that are generated, and also restore the value to the default recommendation, which varies for different printers and materials.
Base Style
The base of the model includes the very first layer printed, as well as a few layers of support material. The Base Style option allows you to configure the shape of the base. "Model and Supports" creates a base beneath the model and any support structures, and fills in all closed loops within the base. "Model Only" creates a base beneath only the model, and closed loops are not filled.
| Model and Support | Model Only |
|
|
Advanced Settings
These settings are available only for the Fortus, F123 Series, and F900 printers unless otherwise noted.
Tray Settings

Model Material
Select the model material for the tray. Different printers support different materials.
Support Material
Support Material is selected automatically, based on the model material. It can be changed from the default selection if there is more than one support material for the model material.
Slice Height
Select the slice height of the material. Different materials support different slice heights. All materials support the 0.0100 inch (0.2540 mm) slice height. Other possible slice heights are 0.0050 inch (0.1270 mm), 0.0070 inch (0.1778 mm), 0.0130 inch (0.3302 mm), and 0.0200 inch (0.5040 mm). For the Stratasys F3300 printer the available slice heights are metric; 0.2500 mm (0.0098 inch) and 0.5000 mm (0.0197 inch).
When a networked printer is selected loaded materials and tips are marked by a green bar. Available materials are marked by an orange bar.
Material Setup (Stratasys F3300)
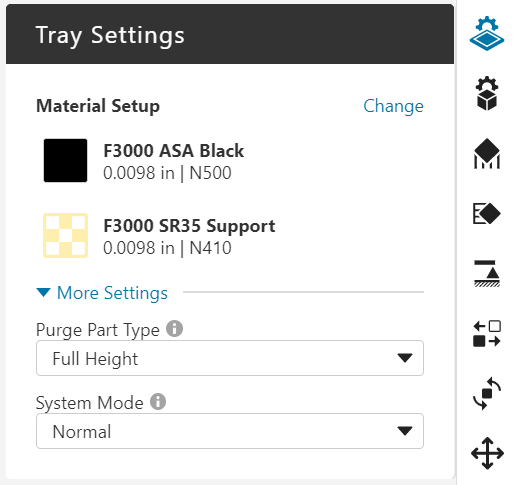
A Material Setup is a combination of a material, its color, a selected slice height, and the nozzle used to extrude material. Material Setups are used on the Stratasys F3300 printer, which requires a minimum of 2 (Model and Support) and as many as 4. Material Setups may be edited by selecting Change on the Tray Settings panel, which opens the Change Materials and Slice Heights dialog.
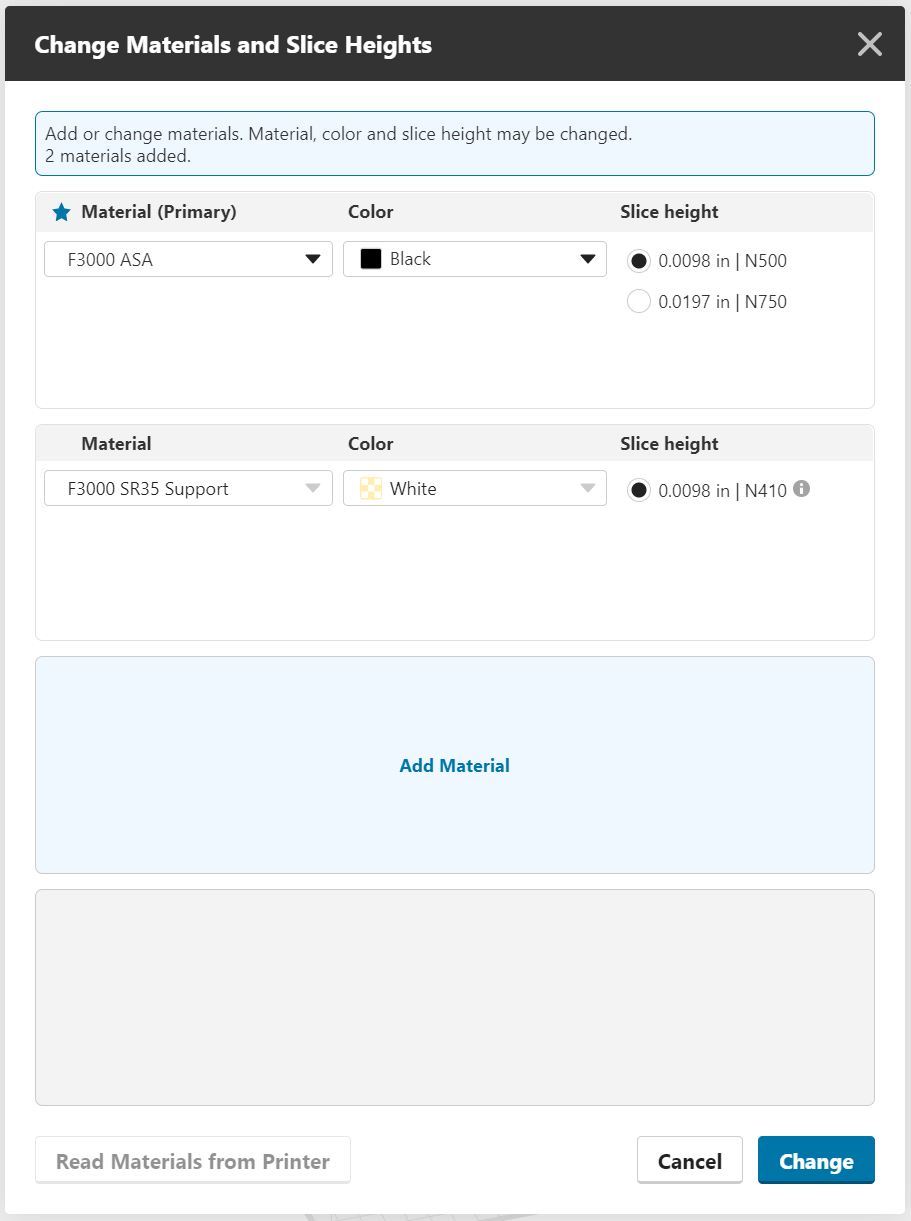
The Change Materials and Slice Heights dialog works from left-to-right, and top-to-bottom:
Left-to-right
Selecting a material determines possible colors, slice heights, and nozzles.
- Top-to-bottom
- Selecting a material determines the support material, its slice height, and nozzle
- Selecting a material limits additional materials to compatible materials.
Materials for networked printers may be read by clicking the Read Materials from Printer button. Click Add Material to add another material.
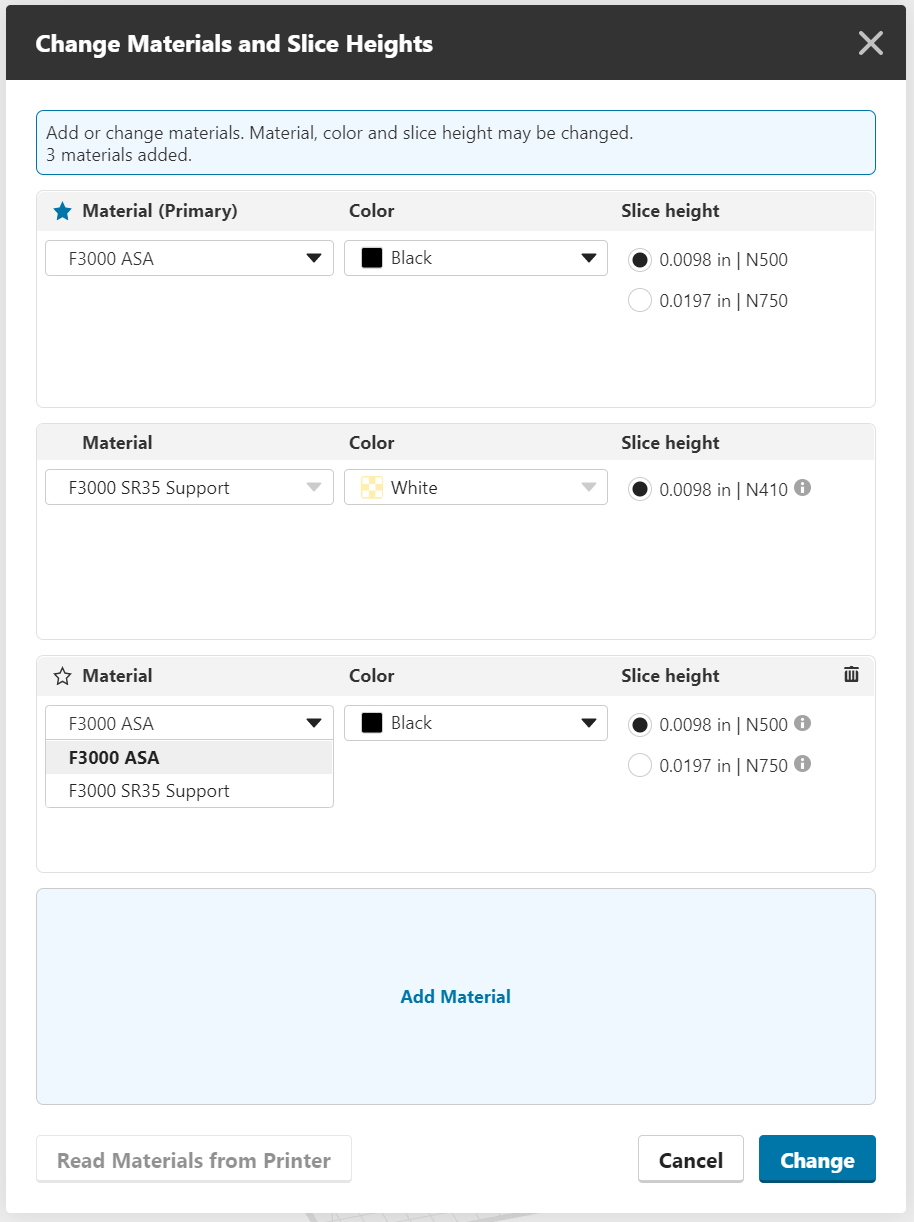
Each tray has a primary material that is assigned to models added to the tray. identified by a blue star

and the text (Primary) next to the Material label. The Primary Material is listed first when the Change Material and Slice Heights dialog is opened, and wherever material setup selection is allowed. The primary material automatically defines the support material and its setup, and limits what secondary material setups may be added. A secondary material can be made primary by clicking the star icon

to the left of its name, and deleted by clicking the trash icon

on the righthand side of the material card.
While a printer may be configured for different materials at the same time, materials set up for a tray must be compatible with each other. Compatibility is defined by the primary material. Compatibility rules are:
Same base material (e.g. ASA)
- Same support material (e.g. SR35)
- Same slice height and nozzle (e.g. 0.5000 mm (0.0197 inch) | N750)
Incompatible materials are identified by a red boundary and must be resolved before a Material Setup can be used on the tray.
Incompatible materials may be updated by:
- Editing the material to make the materials compatible
- Selecting Update at the top of the dialog, which replaces the incompatible materials.
- Delete the material.
- Change primary material (which changes the conflicts)
- Selecting Change, which deletes the conflicts and updates the materials for the tray.
An exception to the compatibility rules:
- When slice height of the primary material is 0.2500 mm (.0098 inch), the same material with a slice height of 0.5000 mm (0.1970 inch) is allowed. The user may assign this combination to a model. If the user assigns a different material to the 0.5000 mm slice height it will not be marked as incompatible, but it will be ignored.
Select Change or Cancel to exit the dialog and return to Tray Settings.
Slice Style (Fortus 900mc and 450mc; Stratasys F900; F123 series except the F170 and F120)
Set how the slice height is applied to the model. Constant uses a single slice height for the entire model. Adaptive uses the selected slice height for features that require more detail like domes, fillets, and chamfers, and a thicker slice for features where detail is not needed, like vertical walls. This feature is available for nominal slice heights 0.010 inch (0.2540 mm) or 0.007 inch (0.1778 mm).
| Selected Slice Height | Additional Slice Height |
| 0.0070 inch (0.1778 mm) | 0.0100 inch (0.2540 mm) |
| 0.0100 inch (0.2540 mm) | 0.0130 inch (0.3302 mm) |
Note: Adaptive Slice Style is only available when only one model is active on the tray.
Part Build Style (F123 Series except the F120 and F770)
These are like presets. Build Styles other than Normal will apply certain model and tray settings as well as change the way the printer operates for this job.
Normal — No preset; fully user-defined. Available for all materials except PLA, and required for F123 TPU 92A and F123 Diran 410MF07.
Draft Mode — Uses sparse fill with less support to increase throughput and improve manual support removal. These settings significantly increase job throughput. Some support settings may be changed, however this is not recommended. Available for all materials except F123 TPU 92A and F123 Diran 410MF07, and required for PLA.
Purge Part Type / Sacrificial Tower Type
F123 Series printers use a purge part on the tray instead of a purge bucket behind the tray. This reduces head movement per layer, reducing print time. Purging is needed when the printer swaps from printing model to support material in each layer. For Fortus printers, you may want to add a sacrificial tower, even though material is already purged into the purge bucket. The seam quality is often lowest on the first part after the purge, so introducing a sacrificial tower to the tray will make sure the seam quality is consistent for all parts on the tray. This helps especially for Nylon materials, and is required for printing with Nylon 12 CF.
Often, the upper layers of a print will not use any support material, so purging is not required. This setting adjusts the height of the purge part. In model view, the purge part on the tray will always display as "Full Height" regardless of your setting, but if you go to Slice Preview you can see the actual height.
Last Swap — The purge part will only be as tall as the last layer of support material
Full Height — The purge part will go all the way to the last layer of model material.
Note: If you have selected PLA as your material, there is no purge part, since support material is not used.
System Mode
System Mode sends additional information about models in a job to the printer. Available options depend on the printer, material and slice height selected.
Normal (Default) — use for most part printing.
Brick — use to reduce part curl when printing large, dense parts. The Brick option is available for ABS, ASA, PC-ABS, ABS-CF10, and Nylon-CF10 on F123 Series Printers. Which slice heights and materials are supported will vary, depending on the F123 Series printer selected for the job.
Thin Wall — use to reduce curl and deformation when printing parts with a large number of thin walls. The maximum thin wall thickness varies by material:
- 0.0900 inches (2.29 mm). All ULTEM™ 9085 Resins and ULTEM™ 1010 Resins, Antero 800NA, and Antero 840CN03 materials
- 0.1000 inches (2.54 mm) Nylon 12, Nylon 6, Nylon 12 CF, and Diran 410MF07
First Layer Material (For the F123 Series except the F770 and F120)
When 0.005" slice height is selected, you can choose whether to use support or model material for the base layer that makes contact with the tray. This slice height uses a lower chamber temperature, and to improve tray adhesion and ensure part quality, model material is the default selection. However, when you want your part to be easy to remove from the tray, you can use support material for the base layer. You can also use this in conjunction with Brick Mode (see above) to raise the chamber temperature.
Model Settings
Advanced settings may be applied at the body or face level, depending on the type of file selected. Toggle between body and face selection with the tabs in the Model Settings panel, or by hitting the B or F key while the Model Settings panel is open.
Body Settings

Group Behavior
When applying body settings to an assembly, more options are available once you create a Group. After adding an assembly file or multi-body part file to the tray, select either the top-level assembly or a few components that you want to print, and create the Group by hitting the button in the project panel or the right-click menu. The Group is a flat assembly structure consisting of only the selected components, and the original assembly is hidden. When you select the Group in the file list, the Group Behavior setting is shown in the Model Settings panel.
Separate Bodies — Each component can have its own body setting. This is the default setting when you create a Group.
Combine Bodies — One body setting applies to the whole Group. This is also the behavior for an assembly if you do not create a Group.
Printing a Group with the Separate Bodies behavior allows you to optimize the physical properties of the printed part. For instance, some areas can be printed with solid infill for strength, while others can be sparse to save weight. Define these regions during the design of your model in your CAD system.
Infill Density
Some infill styles allow for the density to be controlled. Increasing the density reduces the gap between infill rasters for greater strength, and decreasing the density moves the rasters farther apart, decreasing material usage and print time.
Body Thickness
Infill Angle
Set the angle of infill rasters for first layer of the part. The angle increments by a set value for each additional layer. The increment is most often 90 degrees.
Thicken Thin Walls
When the model is sliced, some areas of the slice may be narrower than two toolpath widths (four times the slice height). With this setting enabled, narrow areas will be thickened to the minimum wall width. If this setting is disabled, toolpaths will not be generated where they do not fit. If the setting is not available, it is on by default.
| Off | On |
|
|
Variable Width Fill
Fills regions of a model where a regular width contour or raster pattern will not fit. A toolpath is created along the center of the region, varying in width as necessary to fill the region. This results in a denser, stronger model.
| Off | On |
|
|
Wrap Model
Enclose a Group with Separate Bodies in a common shell. The shell adds strength when joints between bodies in the group are not designed to resist applied loads. For the Stratasys Wrap Model is on by default.
Material and Slice Height Combos (Stratasys F3300)
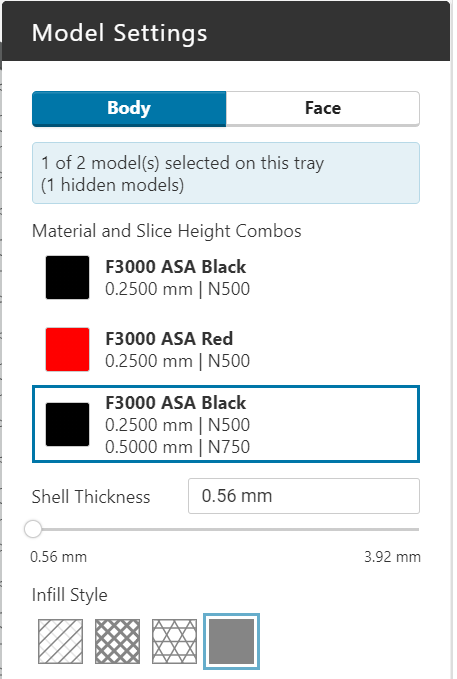
Up to 3 model materials may be printed on a Stratasys F3300 tray. Model Materials are shown on the Model Settings panel. The first material listed is the primary material. It is assigned to all models added to a tray. When additional (secondary) materials are available, they are assigned by selecting the model, then selecting the model material on the Model Settings panel.
Double Height Infill
Different materials for a tray must be the same slice height. The same material may have two different slice heights used in a specific way:
- The shell of the model is 0.2500 mm (0.0098 inch) slice height
- The infill is 0.5000 mm (0.0197 inch) slice height
- The infill is solid
This combination of single height shell and double height infill is not supported for different materials.
Assigning Different Materials to Bodies in a Group
Groups with Separate Bodies support distinct settings for each body. The ability extends to materials. To do so:
- Select the body in the Group
- Select a material on the Model Settings panel
Note
When assigning different materials to bodies in a Group confirm that Wrap Model is unchecked. If Wrap Model is checked the entire model will be encased in a shell of the primary material.
Face Settings

Depending on the file type of the selected model(s), you may be able to apply settings at the face level. Face settings are only available for file types that contain BREP geometry. Mesh-only formats (.stl, .wrl, .obj, and .3mf) do not contain precise BREP geometry, so face selection is not available. Native CAD formats like .sldprt, as well as some interchange formats like .stp and .igs, all contain BREP geometry, so both body and face selection are available. Additionally, face settings cannot be applied to ungrouped assemblies, or groups with the Combine Bodies behavior selected.
Apply Insert
Because it isn't advisable to 3D print a thread, you may want to use a metal insert after your print is completed. The Apply Insert feature ensures that the printed part has the proper hole dimensions to receive it. Select a hole (cylindrical face), and then check the Apply Insert checkbox. Choose the type of insert (tapered heat set or Helicoil) and size, and the recommended hole dimensions shown will be applied to the selection.
If the hole dimensions don't match the recommendation for your insert, you can select Custom and input your own dimensions. Clicking "Save Custom Size" will add it to "My Library." If you have many insert dimensions to add, you can create a custom library file and add it using File > Preferences > FDM. The file must be a .JSON text file and have the following format:
{
  "version": "1.0",
  "name": "Custom Library 1234",
  "libraryType": "insert",
  "entries": [
    {
      "version": "1.0",
      "name": "MyInsert 1",
      "type": "insert",
      "content": {
        "name": "MyInsert 1",
        "diameter": 0.2,
        "thickness": 0.2,
        "units": "in"
      }
    },
    {
      "version": "1.0",
      "name": "MyInsert 2",
      "type": "insert",
      "content": {
        "name": "MyInsert 2",
        "diameter": 0.4,
        "thickness": 0.2,
        "units": "in"
      }
    }
  ]
}
Make Self-Supporting
If you have holes in your geometry that will print horizontally, this feature will change them to a diamond shape so that they don't require support material.
Avoid Seams
The start/end of a toolpath leaves a mark on a printed part called a seam. To keep seams from being placed on key surfaces, select the surface and check the Avoid Seams checkbox.
Surface Thickness
Similar to the thickness control for bodies, but applied to a particular face.
Support Settings
Currently there are no advanced support settings. See the basic section above.
Stabilizers

To create a Stabilizer, select a model (assembly, multi-body part, group, or part), then select the Stabilizer icon on the toolbar. Stabilizers are defined for one model at a time. Once the Stabilizer icon is selected, the model is analyzed and a Stabilizer is added with the default settings.
Configuring the Stabilizer
The following parameters define the size, shape, and location of the Stabilizer. After choosing the height, you may want to switch to a top-down view with perspective turned off to configure the other parameters in this section.
Height

The Stabilizer height is marked by a blue plane with an attached arrow. Click and drag the arrow to adjust the Stabilizer height up or down or by editing the Height setting in the Stabilizer panel. The default height is 80% of the model's height.
Reference Curve

The Stabilizer height plane intersects the model, creating one or more closed loop curves. When there is only one loop, it is selected automatically and displayed in blue. When multiple loops are created, one is selected automatically and the alternate loops are displayed as white. Select an alternate loop by clicking it.
Start and End Points

The Stabilizer does not surround the entire model — it supports a section of the model that you define. The start and end of the Stabilizer are identified by green arrows. The Stabilizer is created between the two arrows. Drag either arrow along the curve to adjust the start or end location of the Stabilizer.
Number of Contact Points
Enter the number of times the Stabilizer will contact the model (2-20 times). Contact Points are shown in the model view as white pins for the Stabilizer that is being edited, and gray pins for Stabilizers that have been defined but are not being edited.
Depth
The maximum distance between the Stabilizer contact and its back wall measured at the Stabilizer height.
Type
Stabilizers may be Constant Depth (default) or Flat Back. For Constant Depth, all contacts are roughly the same depth and the back wall will approximate the shape of the model. For Flat Back, the back wall is a straight line.
Configuring the Contact Points
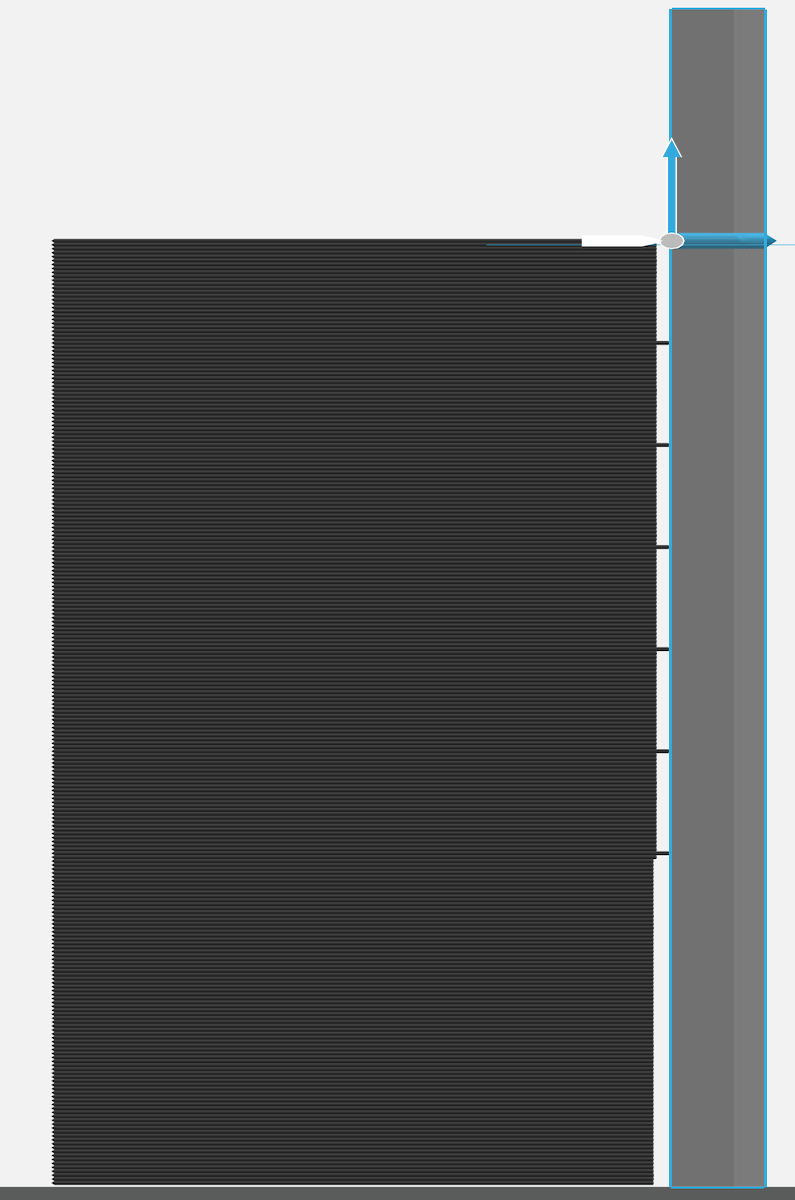
The contact points defined above do not actually touch the model throughout the entire height of the Stabilizer. Usually, the stabilizer is very near to the model surface without touching, but at certain regular intervals, the contact point penetrates the surface, attaching the stabilizer to the model. The next four parameters define the frequency and depth of the penetration. You may want to switch to a side view before configuring these parameters.
Start Height
The height at which Stabilizer contacts start penetrating the model. By default, the start height is zero, meaning that the penetration occurs at intervals over the whole height of the model. In the picture above, the start height has been increased, so that there is no penetration in the lower part of the model.
Contact Gap
The distance a Stabilizer contact point clears the model when not penetrating.
Contact Penetration
The maximum distance a Stabilizer contact point penetrates the model.
Penetration Interval
The vertical distance between contact points that penetrate the model. When a contact point doesn’t penetrate the model, it clears the model by the Contact Gap distance.
| Contact gap | Contact penetration |
|
|
Managing Stabilizers
Once you've added a Stabilizer, you can add more to the selected model by clicking "Add another" or close the panel. Each Stabilizer adds a leaf to its parent model in the Project Pane. To change a Stabilizer’s definition, double-click the Stabilizer in the tree, or right-click and select Edit Stabilizer from the menu. To delete one or more Stabilizers, select the Stabilizer, right-click, and select Delete Stabilizer(s) from the menu.
Anchors

Anchors are support structures that prevent models from curling as they build. Constructed from model material, Anchors attach the underside of a model to the build sheet or tray. The support base and other support structures are not generated for the Anchor, assuring a secure connection between the model and the build sheet or tray. Anchors may also be used to secure downward oriented model surfaces to upward oriented ones.
To create an Anchor, select the Anchor icon on the toolbar. Models on the tray are analyzed, and surfaces where an Anchor can be placed highlighted in blue.

Click on a blue surface to place an Anchor and select the model for the Anchor. The Anchor location is marked with a green arrow and a preview of the Anchor shape.

Configuring Anchors
Once the first Anchor is placed the Anchor panel is activated. The user may set the Anchor Style and diameter(s).
Cylindrical Anchor
A cylindrical Anchor is the default Anchor style. It is defined by a single diameter. Cylindrical Anchors must be used between the bottom-most surface of the model and the build sheet or tray.
Conical Anchor
Conical Anchors are defined by a top diameter and a bottom diameter. The bottom diameter represents a maximum diameter on the build sheet or tray, even when the Anchor terminates on another model surface. The taper of a conic Anchor is also changed by build rules applied to create a stable Anchor feature.
| Cylindrical Anchor | Conical Anchor |
|
|
Anchor Sets
A new Anchor feature is created each time you click on the model. To create an Anchor Set, hold the CTRL key on the keyboard and select another location. Anchors in a set share a Style and dimensions. Keep the CTRL key depressed until to add more locations to the set. Release the CTRL key to create a new set, or to create Anchors for another model on the tray.
To remove an Anchor from a set, hold the CTRL key and select an existing Anchor. Repeat this action to remove more Anchors. When the last Anchor is removed from the set the Anchor feature is automatically deleted.
Tip: For Anchors on the bottom-most surface of your model, orient the tray to its bottom view and use the grid lines to better align your Anchors.

Managing Anchors
Anchors and Anchor Sets are added by selecting a new location. Each Anchor adds a leaf to its parent model in the Project Pane. To change an Anchor’s definition, double-click the Anchor in the tree, or right-click and select Edit Anchor from the menu. To delete one or more Anchors, select the Anchor, right-click, and select Delete Anchors(s) from the menu.

Other actions that may be applied to models with Anchors are Copy/Paste, Duplicate, and Rotate about Z. Any other orientation change will invalidate the Anchor and automatically delete it.
Selecting the Anchor Material (Stratasys F3300)
The Stratasys F3300 printer supports more than one model material for a tray. When multiple model materials are set up the material used for supports may be selected. By default the material assigned to the model is the material assigned to Model as Support.


